Processing Augmented Reality Tutorial - Part 1
Introduction
For a presentation with a Studio that I'm currently working we decided to do feature an augmented reality show. Something simple for people that had little or none experience with AR.
So after doing a little research about what technologies supported AR I decided to use Processing, which I'd never used, but after learning that was a Java environment I supposed that would fit in my confort zone.
Searching I found the following tutorial: Augmented reality tutorial with #Processing
To tell you the truth I struggled a lot with the libraries and the code from that tutorial, I don't understand why there is no indentation (seems like the work of a junior programmer, not trying to offende the author), the interaction with the libraries is buggy, and some of the code is incomplete. But none the less serves as generally good introduction, so let's start from there...
First, I won't be using Processing in the environment provided, but using directly Java with a Netbeans as IDE (but any will do). I'll try to follow the same order of the other tutorial.
The libraries you'll need are:
NyARToolkit 1.1.6 (The library responsible for the pattern recognition among other things).
English NyAR4psg 1.1.6 (I had to translate the source code to understand it, also I was getting a renderer error with the other library that I coundn't figure out. I'm sorry if its no properly translated, it was in Japanese).
Pattern files (Pattern files need for the tutotial, QR markers).
Pattern files (Pattern files need for the tutotial, QR markers).
You'll need the image from the tutorial to get the first example working, you can download it from here.
Environment preparation
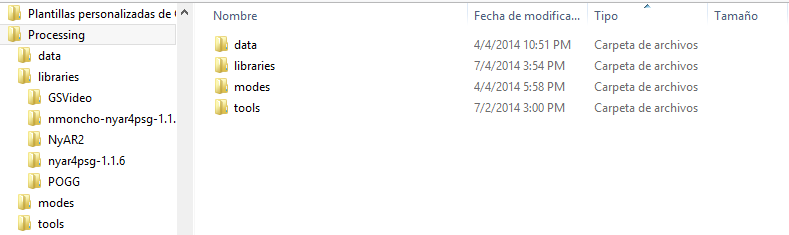
Once you unzip the Processing library in the folder of your choosing (mine is in the Downloads folder, we'll name it processing_folder), create a folder in named processing in the user's documents folder (I think this folder is created by executing processing.exe, but really can't remember, we'll name it processing_workspace), and inside it create another folder named libraries. Inside this later folder decompress NyARToolkit. Lastly in the processing_workspace create a nmoncho-nyar4psg-1.1.6 and unzip the English NyAR4psg library.
The final layout should be like:
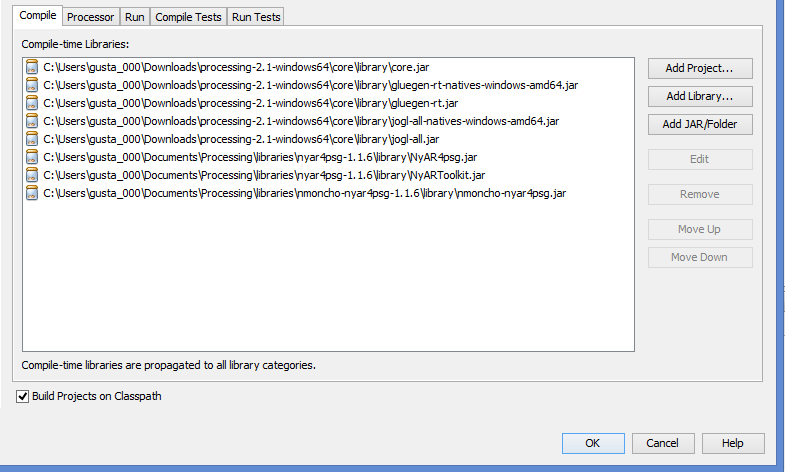
After doing this launch your IDE, Netbeans in my case, create a new Java Application (ARTutorial for example) and add the following libraries to the project:
- [processing_folder]/core/library/core.jar
- [processing_folder]/core/library/gluegen-rt.jar
- [processing_folder]/core/library/gluegen-rt-natives-[your SO-architecture].jar
- [processing_folder]/core/library/jogl-all.jar
- [processing_folder]/core/library/jogl-all-natives[your SO-architecture].jar
- [processing_workspace]/libraries/nyar4psg-1.1.6/library/NyAR4psg.jar
- [processing_workspace]/libraries/nyar4psg-1.1.6/library/NyARToolkit.jar
- [processing_workspace]/libraries/nmoncho-nyar4psg-1.1.6/nmoncho-nyar4psg.jar
In your project properties, in the Libraries panel you should see:
In the root folder of the project you must put the image file (input.jpg), and create a folder named "patterns" and unzip the pattern files provided in the download section. Also, you must copy the " " file from [processing_workspace]/libraries/nyar4psg-1.1.6 folder.
Code
For this example I created a Example01 class:
package artest;
import java.io.File;
import java.io.FilenameFilter;
import processing.core.PApplet;
import processing.core.PImage;
import processing.core.PVector;
public class Example01 extends PApplet {
/** Relative path to "camera_para.dat" file located in the NyARToolkit library folder. */
private static final String CAMERA_PARA_FILE_PATH = "camera_para.dat";
/** Absolute path to the folder containg the patterns. */
private static final String PATTERNS_FOLDER = "patterns/";
/** Extension of pattern files. */
private static final String PATTERN_FILE_EXTENSION = ".patt";
/** Resolution of the sketch. */
private static final int SKETCH_WIDTH = 640, SKETCH_HEIGHT = 480;
private com.nmoncho.nyar4psg.MultiMarker nya;
private float displayScale;
private int patternsLoaded;
private int[] boxColors;
private float[] boxScales;
private PImage inputImage, scaledInputImage;
@Override
public void setup() {
size(SKETCH_WIDTH, SKETCH_HEIGHT, OPENGL);
inputImage = loadImage("input.jpg");
scaledInputImage = inputImage.get();
scaledInputImage.resize(SKETCH_WIDTH, SKETCH_HEIGHT);
displayScale = (float) width / SKETCH_WIDTH;
nya = new com.nmoncho.nyar4psg.MultiMarker(this, SKETCH_WIDTH, SKETCH_HEIGHT
, CAMERA_PARA_FILE_PATH, com.nmoncho.nyar4psg.NyAR4PsgConfig.CONFIG_DEFAULT);
patternsLoaded = loadPatterns(nya, PATTERNS_FOLDER);
boxColors = new int[patternsLoaded];
boxScales = new float[patternsLoaded];
for (int i = 0; i < patternsLoaded; i++) {
boxColors[i] = color(random(255f), random(255f), random(255f), 160f);
boxScales[i] = random(0.5f, 1.9f);
}
}
@Override
public void draw() {
// in the other tutorial is used "background(0)" instead
// but don't works properly, you'll see a black screen
background(scaledInputImage);
nya.detect(scaledInputImage);
drawMarkers();
drawBoxes();
}
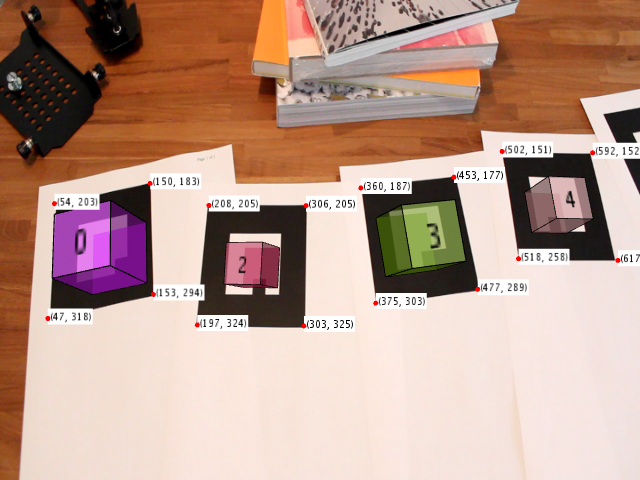
/**
* Draws red dots in each marker's vertex, and tags its coordinates.
*/
private void drawMarkers() {
textAlign(TOP, LEFT);
textSize(10);
noStroke();
scale(displayScale);
ortho();
for (int i = 0; i < patternsLoaded; i++) {
if (nya.isExistMarker(i)) {
PVector[] pos2d = nya.getMarkerVertex2D(i);
for (int j = 0; j < pos2d.length; j++) {
String coordinate = "(" + (int) pos2d[j].x + ", " + (int) pos2d[j].y + ")";
fill(255);
rect(pos2d[j].x, pos2d[j].y - 10, textWidth(coordinate) + 3, textAscent() + textDescent() + 3);
fill(0);
text(coordinate, pos2d[j].x + 2, pos2d[j].y + 2);
fill(255, 0, 0);
ellipse(pos2d[j].x, pos2d[j].y, 5, 5);
}
}
}
}
/**
* Draws 3D boxes over the patterns detected
*/
private void drawBoxes() {
final float boxInitialSize = 40;
textAlign(CENTER, CENTER);
textSize(20);
for (int i = 0; i < patternsLoaded; i++) {
if (nya.isExistMarker(i)) {
nya.beginTransform(i);
scale(1, -1);
scale(boxScales[i]);
fill(boxColors[i]);
lights();
stroke(0);
box(boxInitialSize);
noLights();
translate(0, 0, boxInitialSize/2 + .1f);
noStroke();
fill(255, 50);
rect(-boxInitialSize/2, -boxInitialSize/2, boxInitialSize, boxInitialSize);
translate(0, 0, 0.1f);
fill(0);
text("" + i, -boxInitialSize/2, -boxInitialSize/2, boxInitialSize, boxInitialSize);
nya.endTransform();
}
}
}
/**
* Loads the pattern files located in the specified folder into the multimarker.
* @param multimarker Multimarker to load patterns.
* @param pathToPatternFolder folder containing pattern files.
* @return amount of pattern loaded.
*/
private int loadPatterns(com.nmoncho.nyar4psg.MultiMarker multimarker, String pathToPatternFolder) {
File folder = new File(pathToPatternFolder);
if (folder.exists() && folder.isDirectory()) {
File[] patterns = folder.listFiles(new FilenameFilter() {
@Override
public boolean accept(File dir, String name) {
return name.toLowerCase().endsWith(PATTERN_FILE_EXTENSION);
}
});
if (patterns.length == 0) {
throw new IllegalArgumentException("The " + pathToPatternFolder
+ "doesn't contain any pattern file (.patt)");
}
for (int i = 0; i < patterns.length; i++) {
multimarker.addARMarker(patterns[i].getAbsolutePath(), 80);
}
return patterns.length;
}
return 0;
}
/**
* @param args the command line arguments
*/
public static void main(String[] args) {
PApplet.main(new String[] { "--present", Example01.class.getCanonicalName() });
}
}
I changed several things from the other tutorial
- Line 68: Added an othro() call, this is necessary because when you draw the boxes, it changes the projection to perspective, so you have to change it back. If you don't do this you won't see the red dots and the coordinate labels.
- Line 95 and 110: Removed the calls to nya.setARPerspective(), setMatrix(nya.getMatrix(i)) and perspective() and replaced it with beginTransform() and endTransform().
You can download the source code of the project.
If you have any problems or suggestions, please get back to me.
EDIT:
After a while of headscratching I remembered why you may get the following exception:
Exception in thread "Animation Thread" java.lang.RuntimeException: java.lang.NoClassDefFoundError: processing/core/PGraphics3D
This has to do with the version of processing and NyARToolkit being used, it need the PGraphics3D class which processing 2.x don't have, so you have to use version 1.5.1 (you can download it from here). Also you have to delete the renderer in the size() call.
Comments
Post a Comment